Here's an overview and guide to what options you have for graphics drivers on Linux, since it can at times be a little on the confusing side. This should get you going.
On Windows, you would go to the vendor's website and download either their driver or their software package like the NVIDIA App or AMD Software: Adrenalin Edition. On Linux, it's a different story.
Notice: for Valve's SteamOS, Mesa graphics driver updates come with SteamOS version upgrades. You don't need to do anything as Valve provide everything. This guide is primarily for other Linux distributions.
Notice #2: before installing new drivers, it's always recommended to run full system updates first and reboot to get your system fresh and ready for it.
AMD and Intel GPUs
AMD and Intel GPUs use Mesa. Mesa is not one driver, but a collection of lots of different open source drivers. You may have heard terms like "RADV" which is the Mesa AMD Vulkan driver, or "ANV" which is the Mesa Intel Vulkan driver. Mesa will be installed and ready to use by default when you install any Linux distribution.
For AMD, there was also AMDVLK but that was discontinued in September 2025.
How to tell your current version of Mesa?
Open up a terminal (like KDE Konsole or GNOME Terminal) and run this command:
glxinfo | grep "Mesa"
This will then give you a readout similar to this:
client glx vendor string: Mesa Project and SGI
OpenGL core profile version string: 4.6 (Core Profile) Mesa 25.0.3-1ubuntu2
OpenGL version string: 4.6 (Compatibility Profile) Mesa 25.0.3-1ubuntu2
OpenGL ES profile version string: OpenGL ES 3.2 Mesa 25.0.3-1ubuntu2
Highlighted in bold text above is the version of Mesa you currently have installed.
If you get an error that glxinfo is not found, you can install it yourself.
On Ubuntu / Linux Mint / Debian it's a package called "mesa-utils".
sudo apt install mesa-utils
On Arch Linux it's also called "mesa-utils":
sudo pacman -S mesa-utils
On Fedora, it's called "glx-utils":
sudo dnf install glx-utils
How to update Mesa?
That will entirely depend on exactly what Linux distribution you're currently running. They all have their own way of doing the updates. Most Linux distributions will give you a new version of Mesa with major distribution updates, like Ubuntu 23.10 to Ubuntu 24.04. Rolling release distributions like Arch Linux will provide new Mesa versions regularly as they release.
Ubuntu / Kubuntu / Linux Mint
For Ubuntu / Linux Mint (Kubuntu etc) you can use the kisak-mesa fresh PPA to get the latest versions of Mesa. Do this in terminal to add the PPA and then update your package listing:
sudo add-apt-repository ppa:kisak/kisak-mesa
sudo apt update
After that, run upgrades to get the newer Mesa:
sudo apt upgrade
Alternatively you can use the kisak-mesa stable PPA for slower updates.
Fedora, Arch Linux, Manjaro, EndeavourOS, Bazzite
They all often provide regular updates to Mesa. So just check for system updates in the usual way with your system update tool.
Debian
You probably shouldn't use Debian Stable for gaming as Mesa will be pretty old on it. Perhaps try Siduction if you must stick with Debian.
NVIDIA GPUs
For all modern NVIDIA GPUs, you'll want NVIDIA's own proprietary driver. How you get this, much like Mesa, depends on your Linux distribution installed. Some distributions make this more complicated than others.
Ubuntu / Kubuntu / Linux Mint etc
You can use the "Additional Drivers" graphical app, find it in your menu and select the version you wish to install using the UI.
Alternatively, there's also the graphics drivers PPA, adding this PPA will often give you access to much newer drivers.
You can also check what's available on Ubuntu in terminal too using:
sudo ubuntu-drivers list
And then select one to install via terminal like so (example using the 560 driver series):
sudo ubuntu-drivers install nvidia:560
Once installed you can then reboot.
Pop!_OS
Ideally, use the "Pop!_OS with NVIDIA" download and install the operating system that way, as it should set it up for you. Otherwise you can load up the "Pop!_Shop" application and search for "nvidia-driver", and it will list what they have currently. Pop generally include lots of old and new drivers out of the box with their own official PPA pre-installed, so you shouldn't need to do anything else. Pop!_Shop will list things like nvidia-driver-570 and nvidia-driver-560, just choose the series you wish to install.
Once installed you can then reboot.
Bazzite
Bazzite (with the NVIDIA image) comes with it pre-installed for you. And updates it for you with the system. No user input is needed.
Fedora
This guide assumes you have Fedora 41 or later. Also, this depends on if you have secure boot enabled or not. Either way, first you need to install the RPM Fusion repository to get access to the drivers.
Fedora UI Instructions
Fedora KDE: to make it slightly easier open the Welcome Centre app and scroll through to the "Enable Third Party Repositories" page, and click the button to enable them. After that, you can load up the app called Discover and search for NVIDIA drivers to install. As shown in the shots below:

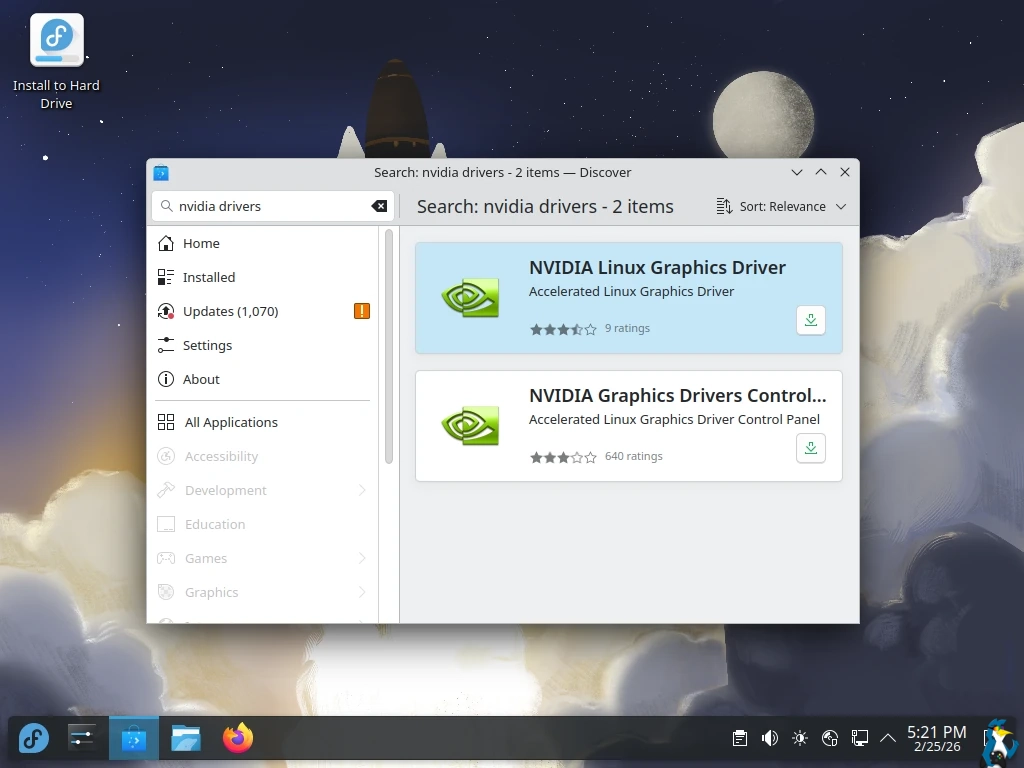
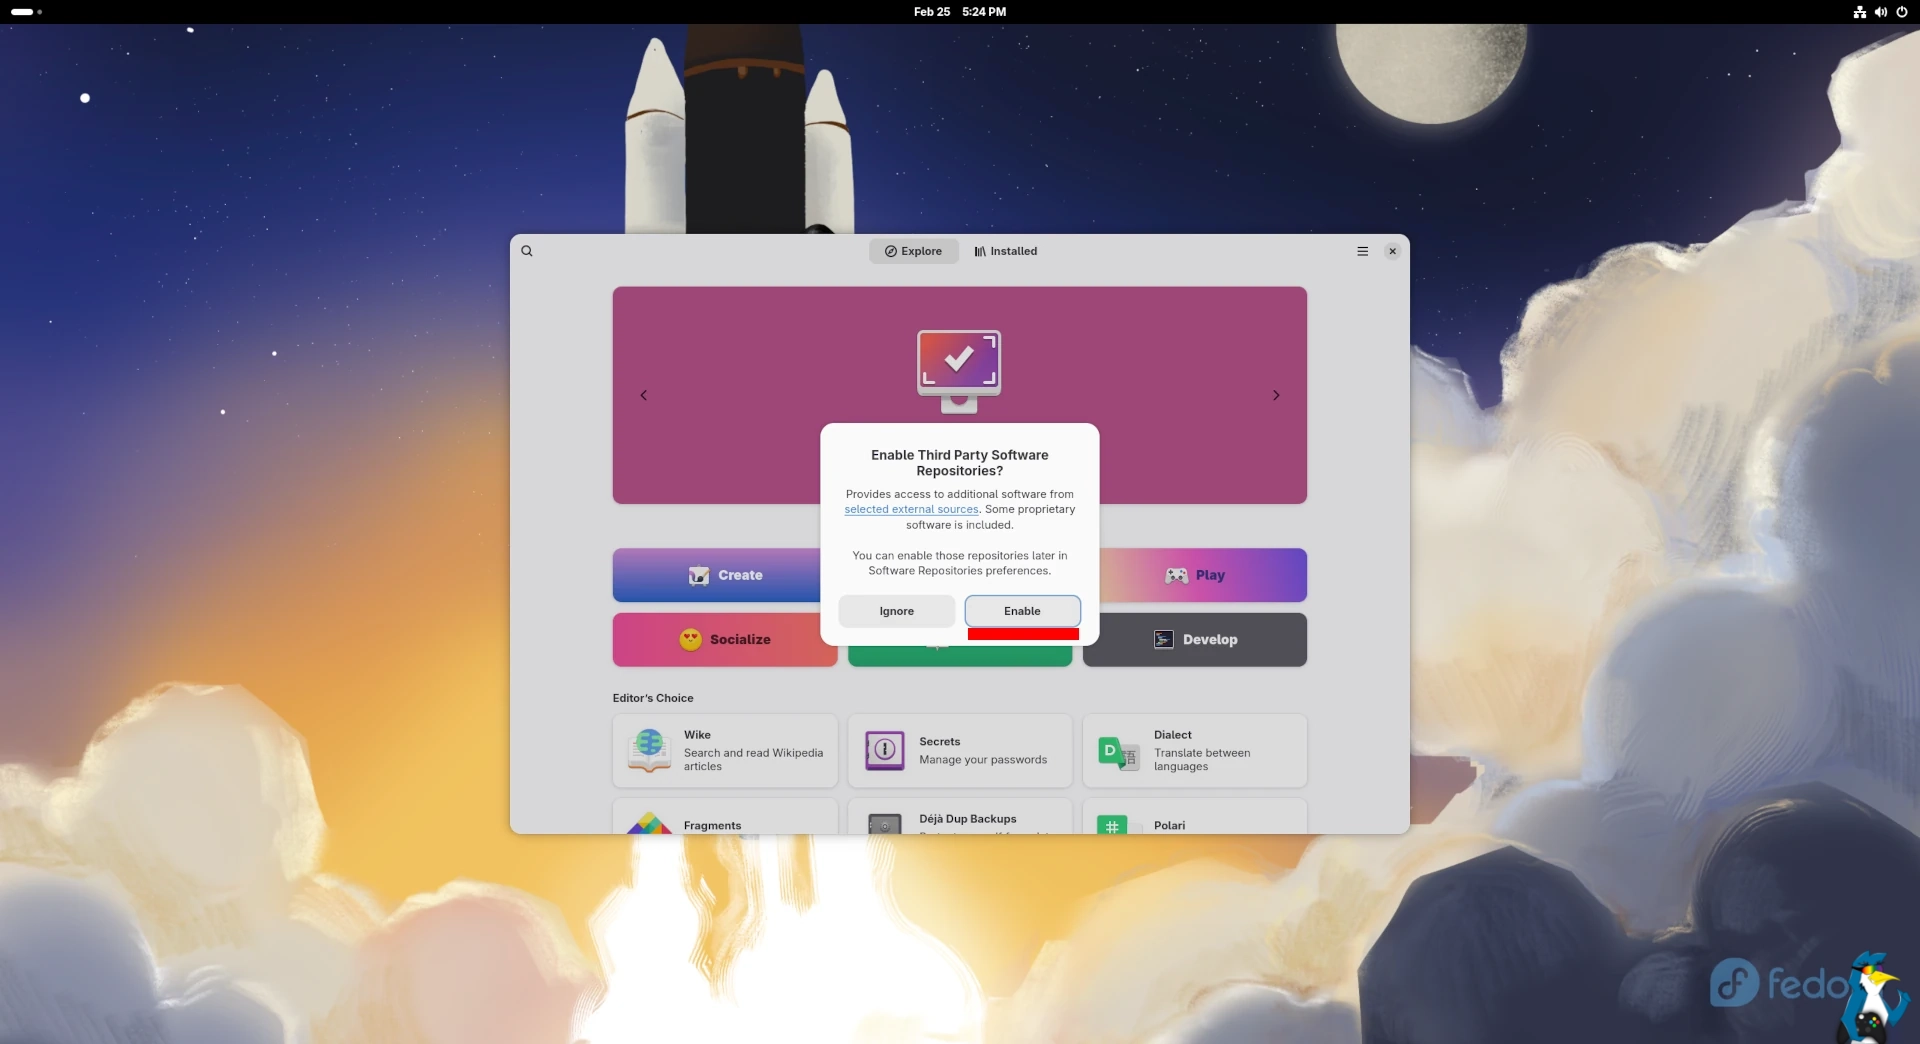
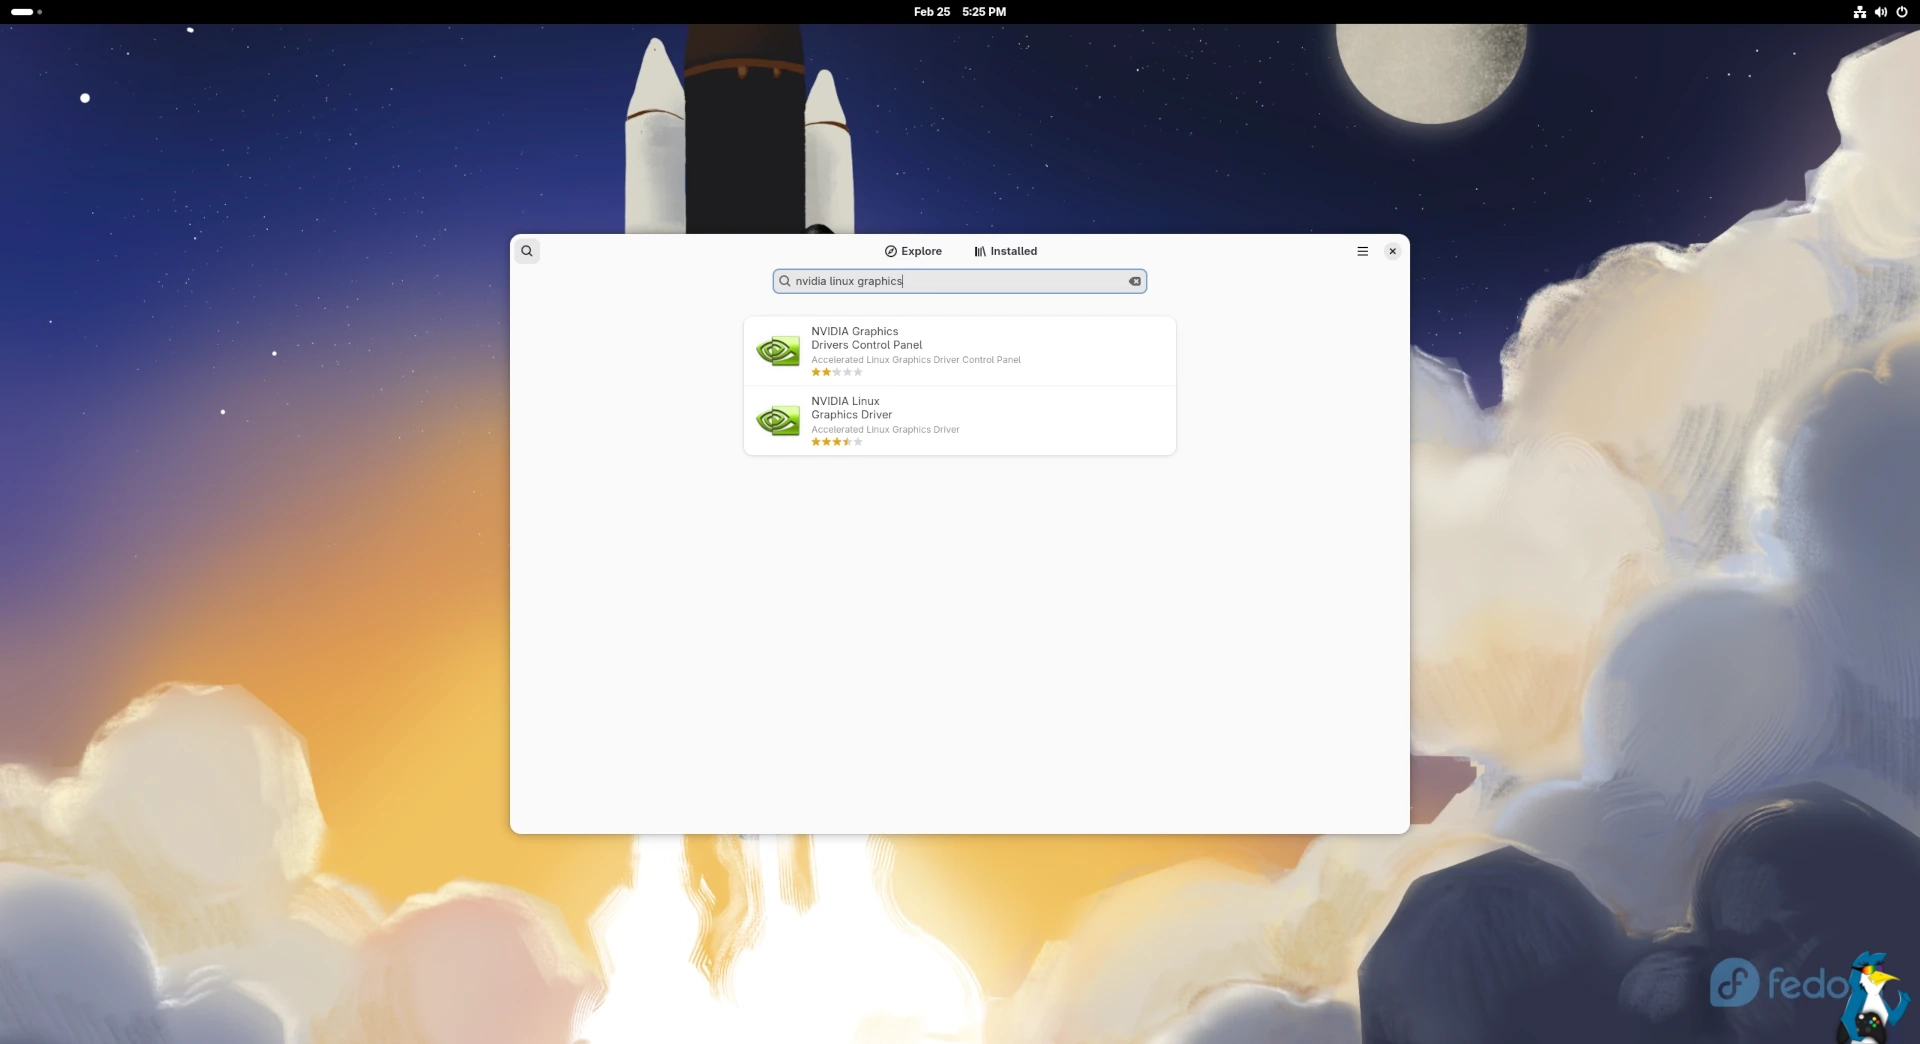
Fedora Workstation (GNOME): all you have to do is load up the Software app, and it will prompt you to enable third-party repositories. Once done, you can search for the NVIDIA Linux Graphics Driver. As shown in the shots below.
Fedora Terminal Instructions
1) Install RPM Fusion:
sudo dnf install https://mirrors.rpmfusion.org/free/fedora/rpmfusion-free-release-$(rpm -E %fedora).noarch.rpm https://mirrors.rpmfusion.org/nonfree/fedora/rpmfusion-nonfree-release-$(rpm -E %fedora).noarch.rpm
You also need the openh264 library to be enabled:
sudo dnf config-manager setopt fedora-cisco-openh264.enabled=1
2) Secure Boot (skip to section 3 if not needed):
If you have Secure Boot enabled, you also need these next few steps. First install these packages:
sudo dnf install kmodtool akmods mokutil openssl
Then generate a key:
sudo kmodgenca -a
Save the key. This next step will ask you to make a password, note it down securely as you'll need it:
sudo mokutil --import /etc/pki/akmods/certs/public_key.der
Reboot now.
You'll now get a screen that asks you about enrolment. Pick to import the key we generated earlier and enter in the password you made above.
3) Install Drivers
And then to actually install for modern NVIDIA GPUs:
sudo dnf install akmod-nvidia
To get cuda and nvidia-smi:
sudo dnf install xorg-x11-drv-nvidia-cuda
Once installed you can then reboot.
Once logged back in you can confirm they're installed by running:
modinfo -F version nvidia
Which will show you the version installed in terminal.
Arch Linux
It depends on what generation of NVIDIA GPU you have. The Arch Wiki is the best place for that. For Turing and newer (16xx, 20xx, 30xx etc) you need to pick between these:
nvidia-open for linux
nvidia-open-lts for linux-lts
nvidia-open-dkms for any kernel(s)
You will also likely need 32bit support, since there's a lot of games that are not 64bit. The Arch Wiki again tells you exactly how. Open the "/etc/pacman.conf" file and uncomment the [multilib] section, so that part of the file should end up looking like this:
[multilib]
Include = /etc/pacman.d/mirrorlist
Then run Arch Linux updates either via your software updater app or in terminal this would be:
sudo pacman -Syu
Then you can install the NVIDIA 32bit support:
sudo pacman -S lib32-nvidia-utils
Once installed you can then reboot.
Manjaro
They have an automated installer you can use via terminal:
sudo mhwd -a pci nonfree 0300
Once installed you can then reboot.
EndeavourOS
You can use their automated installer via terminal:
nvidia-inst --32
Once installed you can then reboot.
Debian
They have a full wiki page on this you can read. It differs between what version of Debian you have installed and what GPU you have and requires quite a few steps. Most other distributions make it a lot easier and we don't suggest Debian Stable for gaming as it's always so old. Perhaps try Siduction if you must stick with Debian.
See more from me
 taosecurity 15 May 2025
 Caldathras 17 May 2025

(Info from Launchpad PPA: On hold until Focal and Jammy are retired due to PPA storage limit)
So I added the [Mesa Almost Stable](https://launchpad.net/~ernstp/+archive/ubuntu/mesarc) to my recent reinstallation. Let's see if it works as well in the long term and doesn't cause any problems.
Update: It's now possible to get the latest MESA from Kisak-PPA again >>>
https://www.gamingonlinux.com/2025/07/its-now-easier-to-get-mesa-25-1-on-the-latest-ubuntu-25-04/
Last edited by Greo on 7 Jul 2025 at 5:03 pm UTC
 Liam Dawe 17 Nov 2025


Added some notes for Debian.Our wiki is bad.
Installing nvidia-drivers on Debian is basically
> apt install nvidia-driver
I made I video talking way too long for the easy task of installing Steam plus Nvidia drivers on a virgin Debian:
https://www.youtube.com/watch?v=aS6mXW7KPoU
 How to setup OpenMW for modern Morrowind on Linux / SteamOS and Steam Deck
 How to install Hollow Knight: Silksong mods on Linux, SteamOS and Steam Deck